So, you want to know how to install WordPress? It means, you have heard about WordPress, and found it as the best solution for your blog. Before we get our hands dirty, and install WordPress, there are some pre-requisites;
- Domain Name: If you haven’t yet registered a domain name, go and grab one for less than $10 with Namecheap.
- Website Hosting: I recommend Blue Host to host you WordPress blog as it is the #1 recommended web host by WordPress. Note: You get 1 free domain name when you host your websites with Blue Host. It costs less than $5 per month to start your blog with Blue Host.

Do Note that above WordPress installation procedure is for web hosting accounts with Cpanel as there admin panel. Cpanel is web based control panel used by most of the web hosting companies to provide a user friendly interface to manage the process of hosting a website. Cpanel creates best environment for WordPress to run, and can be managed by a newbie.
Let’s move onto the installation process: The WordPress installation process is divided into 4 parts for proper understanding and implementation of each step. You have to follow this installation procedure exactly as stated; otherwise you will end up getting error. We also offer a WordPress installation service for just $19.95. You can contact us via this form.
Step 1: Download WordPress Files:
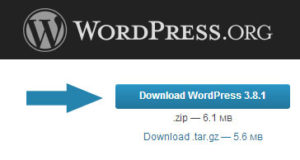
- Visit http://wordpress.org/download/ & click the big blue button as shown in image below to download the latest version of WordPress.
- Once you download the zip file on your computer, locate its location. Most of the time, the file is saved in “Downloads” folder. Unzip the file on your local computer; all the WordPress files will be extracted to a folder called “WordPress”; open that folder and select all files; zip these files and copy the zip file to your Desktop.
Step 2: Uploading Files to your web host:
-
-
- Most of the website hosts today offer Cpanel (Control Panel) with their hosting packages. Open your Cpanel by visiting “http://yourdomainname.com/cpanel” (replace yourdomainname.com with your own domain name). You can find your login details in the email when you signed up with your web host. If you don’t have one, please contact you web host to provide you with Cpanel logins.
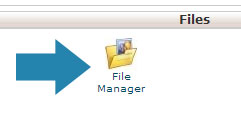
- Once you login in your Cpanel, click on file manager as shown in image below.
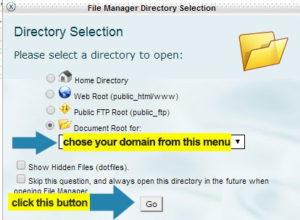
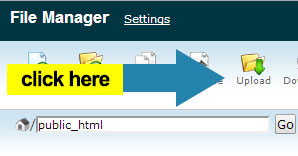
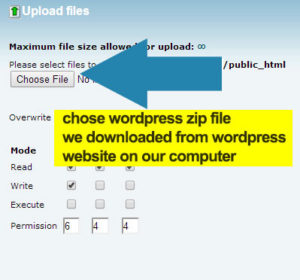
- Your Cpanel will open “/public_html” folder by default. Click Upload button and choose the zip file we downloaded from official WordPress website in Step 1. It will show the status of upload at the bottom right corner of the web page. Once the files upload status shows 100% complete close the tab.
- Now, the zip file will be uploaded in the file manager and you will be able to see it. If you don’t find the file, click on “Reload” button; you will see the file now. Select the file and click on extract button; this will open a pop up message showing the extract destination, click “Extract File” which will extract the file to “/public_html” folder. Close the Tab, you will come back to the home page of Cpanel Admin Panel.
-
Step 3: Create Database for WordPress:
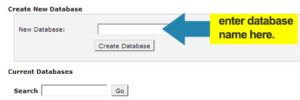
- Enter database name in the empty field & click create database. Note: A database is an organized collection of data. WordPress uses MySql Database to store all content like posts, pages, structure, etc. and access it in a systematic manner. You can use any name as your database name. (e.g. “myninja”, “startsite”, anything….)
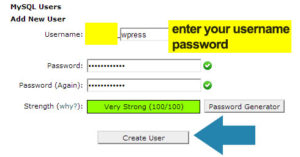
- Once you have created the database, it’s time to create a user that can access this database. In order to do that, scroll down the page and fill the information under the “Add New User” form; once you enter information like Username and Password; Click “Create User”. You will be prompted with a success message.
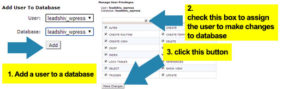
- It’s time to match the user with the database we just created. Under the Add User to Database option, you will find the User and Database, select them from the drop down menu and click add. When you click Add, you will be taken to User Privileges Page; Check All Privileges and Click on the Make Changes Button.
- You will once again receive a success message. Copy paste the MySql Database name and User name into a notepad file as we will require them in the next step.
Step 4: Installing WordPress:
- Visit http://yourdomainname.com/ (replace this URL with your domain name).
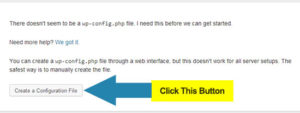
- In previous steps, we uploaded WordPress files in “/publich_html” folder which is the default folder to access your website. So, when you type your domain name and visit your website, you will be presented with a message by WordPress that “wp-config.php” file is not yet created. Click “Create a Configuration File” button.
- This page puts a message asking you to keep details like database name, database username, database password, etc. handy as they will be used in next step.
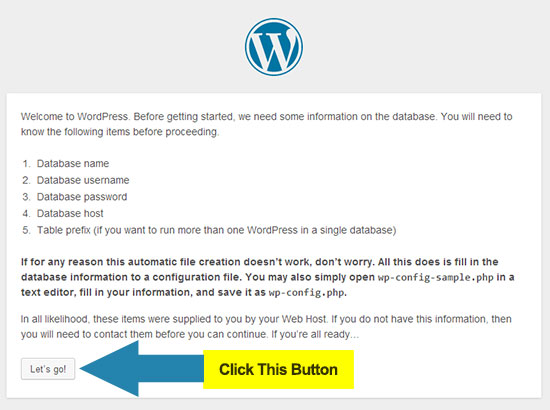
- Click “Let’s go!”
- Now copy-paste the database name, database username, database password from the notepad file we just saved in last step. Enter that information here. Do not change “Database Host” and “Table Prefix” information as it’s not required.
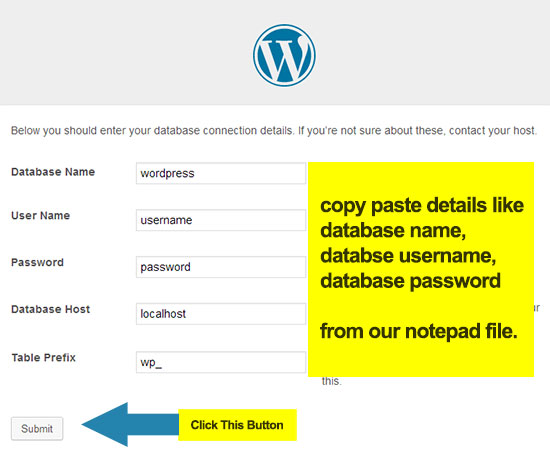
- Click “Submit”
- WordPress will check if your settings are correct. If you entered your database name, database username and database password correct (same as we created in Cpanel of the web host), you will be presented with a success page. If you encounter any problem, go back and check if you entered correct database details in the last page.
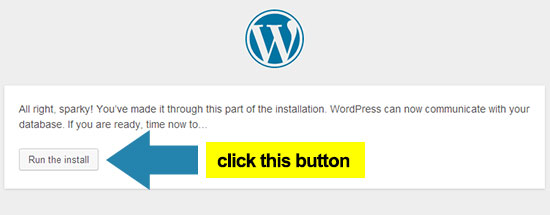
- Click Run the install.
- On this screen, WordPress will ask you to enter your administrative details like Site Title, Username, password, email, etc. Fill this information and click Install in your WordPress.

That’s it…You have successfully installed WordPress on your blog and you will be presented with a success page.
If you encounter any problem, go back and read this WordPress Installation guide again. All the steps mentioned in this guide are required to be done exactly as stated here. You can also contact me to install WordPress on your blog; it just costs $20.